Part 1: Dream Farmhouse Kitchen Remodel with Wall Removal (Includes Before & After Images!)
Your kitchen is where you likely spend a lot of your time. It’s a space to enjoy a morning cup of coffee, a conversation with a good friend, or a quiet moment alone. It’s also the place where you do your dishes, cook your meals, and store your food and other cooking essentials. Perhaps more than any other space in your home, your kitchen needs to have a perfect balance of function and beauty. This means you need a professional designer.

Keely Hersh, owner and designer of Right at Home Interiors in Placerville, California, took on the giant task of transforming her own kitchen into the farmhouse kitchen of her dreams. It was a project over fifteen years in the making, and she used every resource and skill she had to bring it all together.

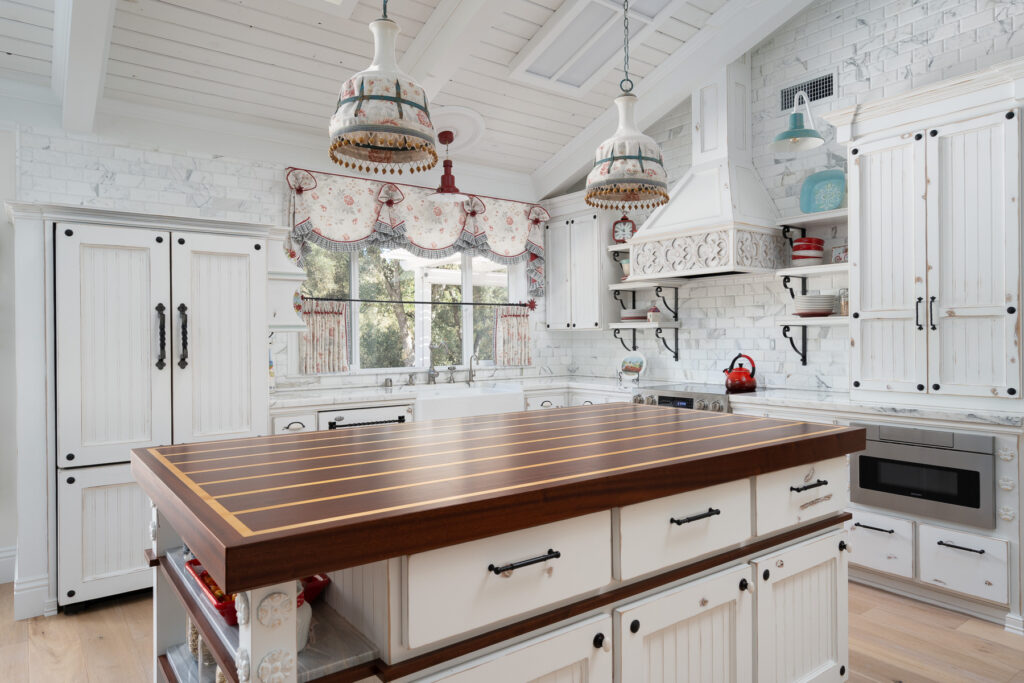
The process was long, but gratifying. The finished kitchen, complete with a Calcutta beveled subway tile backsplash, custom cabinets and moulding, window treatments, and more was worth the wait.

If you want to achieve the farmhouse kitchen you’ve desired for so long, keep reading. Keely’s before and after journey (with pictures!) will show you how you, too, can have a fully redesigned kitchen that reflects your style and makes you happy every time you’re in it – even when you’re doing the dishes!
Before the New Farmhouse Kitchen Renovation
The Beginning Kitchen

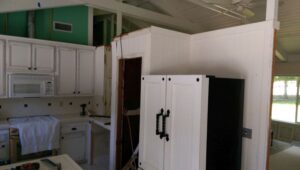
When Keely moved into her home in 2000 she knew immediately that she needed to change the kitchen. While she would have to wait over a decade longer to transform the space into her dream farmhouse kitchen, she was still able to design a holdover kitchen to address the main issues with the original space.

When she and her husband bought the house, the fridge doors in the kitchen couldn’t even open all the way. The fridge had to be moved further down the wall, and a pantry with trash/recycle was built to fill in the space where the fridge used to be. She also painted the cabinets a distressed white and tiled the countertop and backsplash.
The Holdover Kitchen

Keely lived with her “holdover” kitchen for fifteen years before she took the leap and renovated the room into the gorgeous white farmhouse design she’d wanted since buying her home with her husband. This initial remodel was done on the cheap, with the focus on retiling, painting, and appliances.
She and her husband also replaced the floor, changing it from red brick tiles to vinyl. During this process they discovered that the concrete under the floor was jagged and wouldn’t allow for the flooring they wanted. They had to bring in a contractor to pour more concrete in order to be able to use the vinyl.
The semi-remodeled space acted as a good placeholder while Keely continued to imagine her ideal kitchen.
Planning and Inspiration for the Farmhouse Kitchen
Finding Inspiration in Better Homes and Gardens Magazine
In 2016 it was finally time to remodel her new kitchen. Keely wanted a warm kitchen with a cozy feel to match the rest of her home. She discovered a photo in Better Homes and Gardens: Beautiful Kitchens & Baths that inspired her.

The photo featured Calcutta Gold beveled marble backsplash tile. This tile is the whitest marble that can be found, with beautiful gold and gray veining. The beveled edge adds a texture that makes the tile extremely special. Its impact is elegant without being too fancy – perfect for the design Keely had in mind.
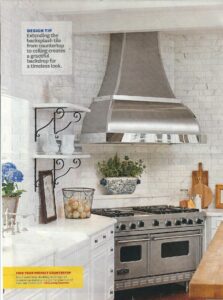
The photo in BH&G shows the marble going all the way up to the ceiling and around the entire kitchen. The look is dramatic and clean. Keely was sold. She spent over a year and a half sourcing the tile. Like all of us who find something truly exceptional, she didn’t want to compromise.
Creating Custom Hardware

The other aspect from the BH&G photo that sparked Keely’s imagination was the black iron brackets. She thought the unique scroll detail and size of them was just right. She knew she wanted to have open shelves flanking a custom range hood, and she felt the iron brackets would add the perfect pop of contrasting black to her white farmhouse kitchen, so she decided to have them custom-made by a blacksmith to her exact specifications.
These brackets are bigger and longer than most. Her blacksmith made sure to design the brackets long and sturdy enough to support both her shelves and what would go on them. It was essential that Keely had these specially made as most brackets found pre-made in stores would’ve been too small to support her design.

The brackets were the catalyst of the project, as Keely had them designed and made before anything else happened. She ordered them, received them, and placed them in her closet for months before using them in the design. Just knowing they were there gave Keely even more excitement about the project knowing that her dream kitchen would soon be coming true.
Designing to Fit the Space

Beyond inspiration, Keely had to consider the practicalities of her space. She knew she was going to have to create a whole new layout to execute the design she wanted. Her fridge would have to have cabinet panel doors built and be moved to the other side of the room. The wall where the fridge used to be would need to come down, and one of the two windows in the room would need to be removed to make wall space for the fridge. A single, larger window would be installed to create the drama, view, and extra light in the space that Keely always wanted.

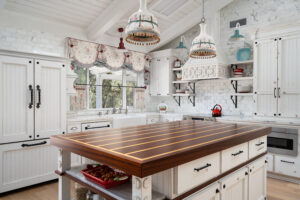
Keely also wanted to add a large island to the space, a decorative range hood, the Calcutta backsplash, new light fixtures, and custom window treatments that she would design and create herself.
 .
. 
Though Keely took a lot of inspiration from the BH&G photo, she designed a kitchen that is entirely unique to her personality and style. The process required a high level of innovation, creativity, and resourcefulness to bring together. It was a big undertaking, but after waiting all those years, Keely was ready for it. Before anything else could happen, though, the wall needed to come down…
Farmhouse Kitchen Construction Begins
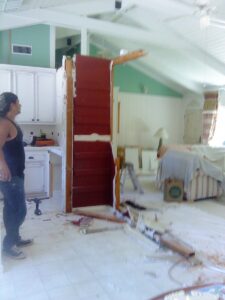
The Wall Comes Down
To create the open concept that Keely wanted for this design, she needed to remove the 3-foot thick wall dividing her kitchen from the rest of the room. The wall was removed in its entirety, and the wall with the range and hood was extended. This created a little jog in the hallway next to the kitchen but was precisely planned so as not to diminish the space in the hallway too much.

The removal of the wall created an expansive space big enough to fit the custom island Keely had designed. It also joined the living room and the kitchen for the very first time and created a Great Room – a highly desired feature for many.
There are two five-foot windows in the living room, the light from which could now pour into the kitchen. The new light created a brightness in the kitchen that would’ve been impossible without the wall removal. The ability to see her garden out her front windows from the kitchen was a revelation. It made the work that went into the wall removal well worth the effort.
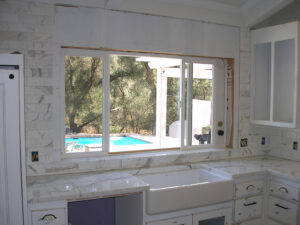
Two Small Windows Become One Large Kitchen Window

The other major piece of construction Keely had to take on was the window. The space had two smaller windows, and Keely decided to remove one of the windows and place her fridge there. To compensate for the loss of that window, she decided to turn the other window above the sink into a much larger window. This required the help of expert-level contractors.

Keely believes that a designer’s work can only be as good as their contractors, and so she sought to find the best. Surprisingly, her initial window contractor fell through shortly before construction was set to begin, but this turned out to be a blessing. In her scramble to find a replacement, she found a new contractor in, of all places, the phone book. After listening to her story the contractor said, “I think I have a day. I can come with my sons, and we can get it done for you.”
When he came to do the work, Keely was thrilled to discover that he was even more skilled than she needed – always a great thing when you’re doing high-level renovation work. Keely considers her discovery of that contractor “a happy accident.” Sometimes things happen during the design process that can’t be helped or controlled, but with resourcefulness and creativity these moments of upheaval can actually have a better outcome than the initial plan in place.

The finished window is a 7-foot window, perfectly framed and installed. The installation wasn’t the last piece of the window puzzle, however. In order to install the window, the outer shingles on the house had to be removed. This is something to keep in mind for anyone looking to install a window in their home. Keely had to replace each shingle, which included prepping, priming, and painting each individual piece before replacing them.
This turned out to be a sizable part of the entire process and should not be taken lightly when considering timelines for your project. Shingles are notorious for bleeding onto white paint and need time to be prepped and dried before replacing. Once these were back in place, however, it was time to address the backsplash, cabinets, and range hood. This is where the room really began to come together.
High-Impact Farmhouse Kitchen Design Elements
The Custom-Designed Range Hood: A Truly Artistic Moment
Keely found a 36×36 piece of wooden art at Pottery Barn and was inspired to use it for the hood even though she didn’t have the hood designed yet. She only knew where she wanted the hood to go in the new kitchen design.

She took the art to a cabinet maker who had the skills to cut the wood into any shape she wanted. The cutting process was simple, but produced a dynamic, detailed piece, thanks to Keely’s choice of material. The filigreed art is a piece many would walk by in a store. They would never imagine a piece of wall art could become a custom range hood. This is one of Keely’s gifts as an interior designer. She sees potential and possibility in non-traditional materials and products.

The finished hood is an ornately curved, filigreed design that fits perfectly in the space. The filigree goes all the way around the front and down the sides and gives the hood a one-of-a-kind look.
 .
. 
This range hood has more dimension than a traditional hood. Most range hoods are made from flat, cut pieces of wood, which could not produce the effect Keely wanted. To finish the range hood, Keely worked with the original art’s finish, but dry brushed some white paint on it. This gave the hood an aged look.
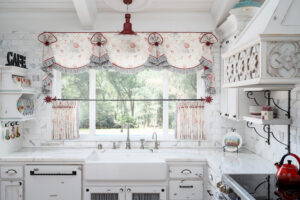
The Calcutta Beveled Subway Tile Backsplash: A Showstopper

Keely knew the Calcutta marble subway tile backsplash was going to be the dramatic star of the farmhouse kitchen. It was the part of the project she originally fell in love with.

The tile’s beveled edge provided a texture to the backsplash and allowed it to pop. It extends from one edge of the kitchen to the other and all the way up both walls.
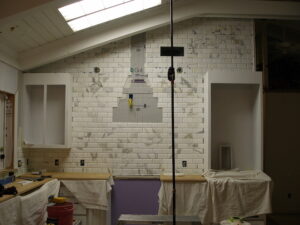
Keely chose to also use the tile over the fridge, which is an uncommon decision, but she knew it wouldn’t look right unless it was a full backsplash across the entire space. Once all the tiles were in place Keely had that “dream come true” moment where she could see that her ideal kitchen really was coming together.

Start Your Own Dream Kitchen Journey with Right at Home Interiors
Can’t wait another minute to get started on the kitchen you’ve always wanted? Contact Keely today to share your idea and discuss how to make your dream kitchen a reality. Virtual interior design is available!
