Fall ’22 One Room Challenge: The Height of Modern Cottage | Week 2
The Height of Modern Cottage Design Week 2: The Peak of Architectural Splendor

Welcome to My Fall ’22 One Room Challenge Featuring Bold Design Choices in a Modern Cottage Style
I’m just so over the moon about participating in this 10th anniversary year of the One Room Challenge!
I look forward to sharing every step with you as the 8-week challenge goes on. Thank you ORC for hosting this wonderful event and I’m excited to cheer on all the other participants as we all take on this design challenge! (Psst…after you’re done reading my story, head over to the ORC Blog Page to read about the other guest participants’ designs.)
If you haven’t already, be sure to follow me on Instagram to stay up-to-date with everything I’m doing for my fall 2022 One Room Challenge.
This Week: Total Wall Overhaul and Extravagant Crown Moulding!

The Wall Panels

Custom Crown Moulding Buildup
This week it’s about two main features: the floor-to-ceiling semi-gloss white wall panels and the custom moulding buildup that will literally raise my ceiling from 8 feet to 9 feet. These elements act as the backdrop to my design and it’s crucial that they are just right. I’m going for architectural excellence full of drama and European charm. I’m so excited to share with you how I’m pulling it all off! Let’s dive right in.
Floor-to-Ceiling Wall Panels: A Feat of Grand Proportions!
The Wall Panel Inspiration Photo

I knew I wanted to create a version of the white, expansive trim panels in this inspiration photo on my walls, too. The semi-gloss white paint I plan to use will brighten the space and make all the walls feel completely like moulding and give it that fresh, modern cottage look. So bold and stunning!
Taking my walls to new heights is a several step process of raised panel detail and potential drama. It’s tricky business designing, constructing, and installing walls like this. Oh my gosh! The panels are put together with tongue-and-groove construction that would be impressive on just a cabinet door, let alone a giant series of walls.
Hit play to watch the wall building in action!
The real nail biter is that the whole unit really does have to fit exactly over the existing wall. That makes each of the following steps crucial to the success of my custom backdrop. Let’s take a look at each step!
1. Sketch a Wall Design to Scale
 I did a line drawing for each wall to show the layout for the recessed panel design. Notice how each of the panels in the drawing are their own unique size and shape. That feature continues throughout the living room, entryway, and hallway. Each panel needs to be just the right size for the overall balance and height of my design.
2. Draw the design on the walls with a pencil

Oh my gosh I actually realized I could draw on my walls because they’re going to get covered up anyway. I transferred my layout from line drawing to my walls to match my original drawing. This not only made it easier for Bill the carpenter to make his own pattern but it allowed me to stand back, see my design, and make sure I liked the way it looks.
3. Bill laid out his own pattern with wood scraps on the wall
 After I drew the lines on the wall, Bill came and laid out the pattern with the help of a laser level. He then packed up the wood scraps he used to create the pattern and took them back to his shop.
4. The wall is built in the workshop
 Bill barely had enough space in his shop to lay out the pattern! But, he managed and once he had the pattern all laid out he created the actual wood pieces. He constructed each piece with a groove on one side and a tongue on the other that lets them fit together like a jigsaw puzzle. Bill decided this would be the best construction technique to give me the solid wood wall from floor to ceiling look I was after. Finally, Bill sanded the stiles and rails before breaking them down and delivering them to my home.
5. The built wall is delivered in puzzle pieces

These walls are a huge architectural phenomenon and couldn’t possibly be delivered already assembled. Instead, Bill broke the whole set down and delivered the pieces in manageable bundles.
6. The wall is reassembled on site and man-handled into position
Hit play to watch the wall building action!
So, at this point we just place the pieces on the wall one by one and we’re good, right? No way! We had to reassemble all the pieces for each wall into one large unit BUT we had to do it vertically otherwise each wall would be way too heavy to lift. Thank goodness Bill marked all the pieces correctly! Can you imagine if we’d had to put it all together by guessing? We’d still be there working on it until next fall’s One Room Challenge!
7. Get the walls on the walls!
Hit play to watch the wall installation in action!
It’s so funny – but that’s exactly what my crew did. They installed a whole wall…on a wall! And then they did it again and again across my whole living room, entryway, and down my hallways. We even had to use a jack to hoist up the walls to get them into the right position!
Finally, Bill had to screw the walls in place and this is where we would find out the genius of Bill’s architectural masterpiece…and we did! Woohoo! The installation was a success! Now, I have expansive, wood-clad paneled walls ready for paint!
8. I prime and paint the stiles, rails and panels by hand (yes, by hand!)
Look at me go! Hit play to see the painting action!
You’re going to see a lot of me painting during this challenge and it all starts here. I chose not to have my walls spray-painted which would’ve saved me hours (…days…centuries!!) of work because, well, you can’t touch up sprayed walls! You have to live with every ding and scratch or else you have to have the whole thing resprayed.
With hand-painting I know I can go back and touch up as needed. Yes, you’ll always see a little bit of brushstroke no matter how meticulous you are, but in cottage design that’s actually a great thing! It fits right in with the style.
I used Sherwin Williams Pro Block Primer and three coats of semi-gloss white paint (SW7005) for that bright modern take on my new cottage design. The sheen of semi-gloss makes it modern but also makes the whole wall feel like moulding.
9. 1000 feet of panel mouldings are custom-made, primed, and painted

Last but certainly not least, I painted the 1000 feet of panel moulding Bill custom-milled for me. Then, he installed it. The panel mould finishes the look, giving it depth and visual dynamism. The backdrop to my living room, entryway, and hallway just wouldn’t be complete without them.
Hit play to watch Bill install the panel moulding at hyper-speed!
It feels so good to see the walls with the trim moulding adding so much depth and dimension. The walls are coming along, but I’ve got so much more to do! Next on the list: Taking my modern cottage design to new heights…


Which outfit would you choose to coordinate with my new paneled walls? Black or white? Let me know by following me on instagram and leaving me a comment!
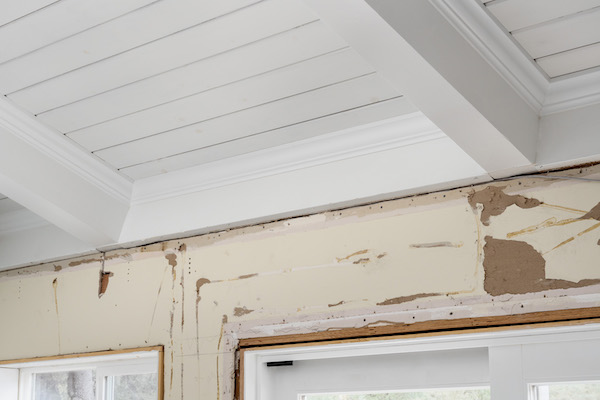
Crown Moulding: An Amazing Feat of Ceiling Magic
The most exciting part of my design is that I am raising the roof both figuratively and literally! The three photos below show the process before, during and after:
How I raised the ceiling
I have a vaulted ceiling that starts at 8 feet and soars to 13 feet at the peak with structural beams and collar ties, and tongue and groove boards in between the beams. I’m working closely with my contractor, Bill, to create a buildup of 2-foot-wide mouldings that will literally raise the ceiling height.
The intricacy of this millwork is unbelievable. To put the moulding together we needed:
- Base trim
- Cove moulding
- Crown moulding
- Relief (that’s the flat area)
- A special custom-made jumbo dental trim that Bill and I designed. Truly one of a kind!
 One of the coolest parts of this moulding design is that I made sure it fits into the existing window trim, which I installed a few years ago. Together, they make for a show-stopping moment.

The key thing about this design is the way the moulding wraps up onto the vaulted ceiling. It’s like it crawls up onto the ceiling to give the room more height!

Featured Sponsor:
Paint & Petals

I’m working with Bridgette Thornton from Paint & Petals to create gorgeous custom floral like the one above. I shared my concept with her and she’s painting left and right versions of her stunning floral art to go on either side of my red fireplace. Her paintings will accentuate the fireplace and will look stunning against my semi-gloss white walls.
 I planned ahead for my commissioned pieces! My paintings were completed with gouache and painted on archival Bristol paper. Bridgette delighted me by painting several floral art pieces for me to choose from. If you are interested in her work she might still have some pieces available for purchase!
Artfully Walls
 Artfully Walls provides high-quality prints of contemporary artists’ work. The materials they use to create their prints really show off the depth and dimension of the artists’ work. The finished result is a fantastic representation of the original piece of artwork. I’ve ordered pieces in the correct size to fit artfully inside my wall panels for a striking gallery-esque moment in each room.
 I’m planning to use artwork from the following artists:
Big reveal day is coming in just a few weeks! Just wait until you see all the gorgeous art from my sponsors hanging on my new walls. Woohoo!
The walls are coming along, but there’s still so much more to do!
Stay tuned to see the big reveal of my crisp, white architectural walls in week 8. This is really just the backdrop of the rest of my remodel. It’s my dream to have a grand look for my Height of Modern Cottage design. I can’t wait to see how it all turns out!
Follow me on instagram so you’ll know right away when next week’s post goes live.
Stay tuned for chapter three of my design story next week!
My All-Star Team
I couldn’t possibly pull of a design of this size and ambition all on my own in 8 weeks! I want to introduce you to the whole team, so you can see everyone who’s going to bring this design to life! (Shhh…don’t tell, but we’re all in our sixties!)
Steve Hersh
My electrician, custom metal worker, and my overall handy guy (oh, yeah, and he’s my husband)! It’s great to have my husband on board supporting me and helping me make this design happen!
Bill Mott
Master carpenter in charge of building…well, everything! I’ve worked with Bill for years. He’s so skilled and passionate about what he does and always goes above and beyond. Just wait till you see the videos of Bill in action! You’ll be amazed at the work he’ll produce just like I am every time I work with him.
Martin Beebee
My incredible photographer! Martin has been instrumental for me when it comes to taking gorgeous, magazine-worthy pictures of my designs. He’s going to work with me throughout the challenge to take in-progress and completed design photos and I know he’s going to help show off every part of my design in the best light possible.
Keely Hersh (that’s me!)
Homeowner, painter, drapery fabricator, re-upholsterer, room stager, finishing detail work…the list goes on! (Oh, yeah, and I’m my own designer this time! What a treat to put my skills to work for myself!)